Monday 30 May 2011

Props


Here are just  some of the props i made along the way 


This is a bath I made for the bathroom scene 
I needed to make two baths. One for the boy and his mum to stand by and one for the boy to actually be in. This is the one they stand by. I made it simply using card and milliput legs and rim


This is how it looked on set


This is one of the scenes it was in

This bath was for the boy and tentacle monster to be in


I made it using an old shoe box and milliput.  (Im like macgyver)


This is the scenes it was used in

The tentacle was made using twisted wire wrapped in a sports tape then dipped in latex the suckers were made from funky foam and glued on


After being dipped in latex 


Final tentacle (as you can see latex dries a lot darker then when applied )

some sitting room props I made Included this couch for the dad and boy to sit on.
It was made from scraps of wood and covered in material 


Final couch


This is a box in the living room with eyes of a hidden monster inside :)


Living room scene contain these props and others

Saturday 28 May 2011

House Build

For my opening scene I wanted to establish the setting where my film was taking place. As it was my opening shot I also wanted it to look as nice as I could to grab viewers attention. I decided to build the house and street in an American style setting in an old craftsman house style.


I started off with a basic structure made from thin sheets of wood we had lying round the room from old sets. As the house was only seen from the front and to save time I just build the front view.


I cut the windows and door out and added the the roof  


I made the wooden panels out of strips of balsa wood and used thinner strips for the windows


I layered them up until the house was fully covered


I then added a door (which opens for the shot), made the window frames and added steps to the porch.


I then began to add details and painting the house


I added a porch using more balsa wood and painted it up


I printed out bricks for along the porch and added a few slate patches to the roof.


For the rest of the set I made a garage, moving boxes and a fence out of a cardboard. Painted a backdrop on a white sheet and made path out of strips of balsa. The road was made from sheets of card paper as was the grass but with grass texture i bought.


This is what the set was like laid out. I made lamp posts and a hydrant out of plastercine and sculpey  and a for sale/sold sign from balsa to add last details.


This is what the final house set looked like


Friday 27 May 2011

Final Boy Puppet

So this is my Boy puppet in all his little Glory


I just used small stick on mouths as he has no lip sync and only few facial expressions in the film


This is his scale on my hand. As you can see he is quite small which made some things quite hard to animate but i worked around them to the best of my ability and have learned from it. I knew i needed him small because if i were to scale him up it would involve scaling the other puppets and entire set up also. I am still happy with how he turned out in the end and feel he looks close to my design

Clothes

As part of  some of our projects we were asked to do some collaboration work with each other. One of my class mates Jess asked if she could make some of the characters clothes, Im not very good with needles and thread so i was more then happy to let her do this. I went and bought all the materials i wanted. Jess made the boys onesie and the dads clothes and I am very happy with both and I made the mums dress.


This is the boys onesie


This is the dads outfit.
I made the shoes for the dad after out balsa wood and sports tape as he is just sitting down and doestnt move to much


The mums dress and apron

Hands and Little Feet

In this post im going to talk about how i make the hands for my puppets and the feet for the little boy.


Il start of by talking about moulding and casting hands.
I first start off by making the armature for the hands using twisted wire and milliput. I make the basic size  I want withe the wire and add milliput palm for strength and to the tips to help prevent sharp wire cutting mould


After the milliput was dry i used plastercine to sculpt and make detail for the hands on top of this.


With my hands made i used the same process as i done with my boys head in my earlier post making a two part mould. After the mould was made i could then remove the plastercine from my hands leaving me with my armature hands which fit nicely into the moulds.


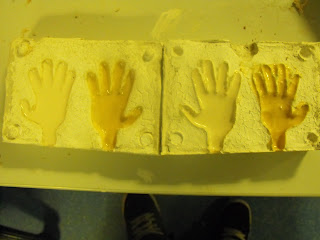
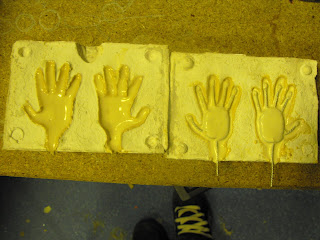
I then began casting by first adding a very thin layer of latex (which i made skin colour ) to the mould. I allowed it to dry and repeated this a few times to bulk it up slightly. The reason for doing this is so the latex picks up all the detail of the hands without having air bubbles on surface as it is the most important part as we can see it.

(left hand side is the thin layer wet and right is when it is dry. latex dries a lot darker so you have to judge colour carefully)


Once the layers were dry i placed the armatures back inside mould.


I poured more latex onto hands then closed mould. I then poured more latex into the wrist and used clamps to keep it all together


When dry I removed hands from moulds


you are left with a seem around the hands which need to be carefully cut off with scissors


The final hands look something like this.
I decided to make my hands in silicone in the end to match my boys head and because it is easier to work with and a nicer finish. I just reused the same moulds and process but just added silicone instead of latex.

For the boys feet it was pretty easy as i didnt need to make them detailed i just needed shape and function as they were going to be under his onesie


I used the replacement feet i made for the boys armature and added metal foot plates. I done this so i had the choice of using magnets as well as tie downs to stand me puppet on the set. For the tie downs i drilled a hole in the foot and glued on a nut so i could screw threaded bar in to tie him down to the set.

 To finish I covered the armature in milliput to get the shape i wanted and to give the feet strength.